How To make Hainanese Chicken Rice
Introduction
If there is one dish that defines the soul of Singaporean and Malaysian hawker culture, it is undoubtedly Hainanese Chicken Rice. To the uninitiated, it might look deceptively simple: a plate of pale chicken next to a mound of white rice. But take one bite, and you unlock a symphony of textures and flavors that is nothing short of culinary alchemy.
The magic lies in the details. It is the slippery, gelatinous skin of the chicken that has been shocked in an ice bath. It is the rice, where every single grain is coated in rendered chicken fat (schmaltz) and infused with the perfume of pandan leaves, garlic, and ginger. And, of course, it is the sauces—the tangy heat of the chili, the savory punch of the ginger paste, and the thick umami of the dark soy—that allow you to customize every mouthful.
Making restaurant-quality Hainanese Chicken Rice at home is a labor of love, but it is entirely achievable. It requires patience, attention to temperature, and a respect for the ingredients. In this comprehensive guide, we are going to break down the process into granular details. We aren't just giving you a recipe; we are teaching you the science and the art behind the perfect poach and the most aromatic rice you will ever taste.
Prepare your kitchen, sharpen your cleaver, and let’s dive deep into the world of Hainanese Chicken Rice.
What Makes This Recipe Special?
You might be wondering, "Why does this recipe need to be so long?" The answer is that texture is king in this dish.
The "Q" Texture
In Asian cuisine, we often refer to a texture called "Q" or "QQ"—a bouncy, springy, toothsome quality. In Hainanese Chicken Rice, we aim for the skin to be "Q." We do not want flabby, greasy skin. We want a skin that has tightened up, separated slightly from the meat, and formed a layer of savory jelly underneath. This is achieved through a precise method of "dunking" the chicken and finishing it in an ice bath.
The Rice is the Star
Many purists argue that the chicken is actually secondary to the rice. The rice shouldn't just be a side dish; it should be flavorful enough to eat on its own. This recipe focuses heavily on the "frying" stage of the raw rice grains with rendered chicken fat and aromatics before the water is even added. This technique ensures that the rice doesn't turn into mush and retains a nutty, savory profile.
The Holy Trinity of Sauces
You cannot serve this dish with just soy sauce. It requires the interplay of:
Chili Sauce: Bright, acidic, and spicy.
Ginger-Garlic Paste: Aromatic and oily.
Dark Soy Drizzle: Sweet, thick, and salty.
We will cover exactly how to make all three from scratch.
Ingredients
To make the best Hainanese Chicken Rice, you need to source fresh ingredients. Here is exactly what you need, broken down by component.
1. The Chicken & Poaching Broth
This is the foundation of the entire meal.
Whole Chicken (1.5kg - 1.8kg): Ideally, use a free-range chicken or a "kampong" chicken (village chicken) if available. These birds have yellower skin and firmer meat, which stands up better to poaching.
Coarse Sea Salt: For exfoliating the chicken skin.
Spring Onions (Scallions): 2 bunches. You will use the green parts for the cavity and the white parts for the sauce.
Ginger: A large knob (approx 100g), sliced into thick coins. Old ginger is preferred for the broth as it has a stronger, spicier flavor.
Garlic: 1 whole head, cloves peeled and smashed.
Water: Enough to fully submerge the chicken.
Sesame Oil: To brush over the cooked chicken.
2. The Aromatic Rice
Do not use instant rice. The texture will be wrong.
Jasmine Rice (3 cups): Long-grain Thai Jasmine rice is the standard.
Chicken Fat: You will harvest this from the chicken cavity before cooking. If your chicken is lean, you can supplement with a little vegetable oil, but rendered fat is the secret to flavor.
Garlic: 4 cloves, minced finely.
Ginger: 1-inch piece, minced finely or grated.
Shallots: 2 bulbs, thinly sliced (adds sweetness).
Pandan Leaves (Screwamer): 3-4 leaves. This is the "vanilla of the East." If you absolutely cannot find fresh or frozen pandan, you can omit it, but the aroma will be less authentic.
Chicken Broth: You will use the liquid from poaching the chicken to cook the rice.
Salt: To taste.
3. The Chili Sauce
Fresh Red Chilies: 5-6 large ones (Fresno or Holland) for body and color.
Bird's Eye Chilies (Thai Chilies): 2-3 pieces (adjust based on heat tolerance).
Ginger: 1-inch piece, peeled.
Garlic: 4 cloves, peeled.
Lime Juice or Calamansi Juice: 3 tablespoons. Calamansi is traditional and floral; lime is a good substitute.
Chicken Broth: 2-3 tablespoons (to thin it out).
Sugar & Salt: To balance the acidity.
4. The Ginger-Garlic Sauce
Ginger: 50g, grated or blitzed (use young ginger if possible for a less fibrous texture).
Garlic: 3 cloves, minced.
Neutral Oil: 3-4 tablespoons (peanut or canola).
Sesame Oil: 1 teaspoon.
Salt: To taste.
5. The Soy Drizzle
Light Soy Sauce: 2 tablespoons.
Dark Soy Sauce: 1 tablespoon (this is thicker and less salty).
Sesame Oil: 1 teaspoon.
Sugar: 1 teaspoon (optional).
Chicken Broth: 1 tablespoon.
6. The Garnish
Cucumber: Sliced thinly on a bias.
Cilantro (Coriander): Fresh sprigs.
Step-by-Step Instructions
This process is divided into phases. Read through all phases before starting to understand the workflow.
Phase 1: Chicken Preparation (The Exfoliation)
Time needed: 15 minutes
Harvest the Fat: Before washing the chicken, look near the cavity opening. There should be pads of yellow fat. Cut these off and set them aside in a small bowl. Do not throw them away! This is "liquid gold" for your rice.
The Salt Scrub: Place the chicken in a clean sink or large bowl. Take a handful of coarse salt and rub it vigorously all over the chicken skin.
Why? This exfoliates the skin, removing dead layers and impurities. It results in a smoother, brighter sheen after cooking.
Rinse: Rinse the chicken thoroughly inside and out with cold water. Pat it dry.
Stuff the Cavity: Stuff the cavity with the smashed garlic cloves, thick slices of ginger, and a bundle of spring onions (tie them in a knot to make them fit better). This perfumes the meat from the inside out.
Phase 2: The Poach (Sub-Boiling)
Time needed: 45 minutes - 1 hour
Boil the Water: Fill a stockpot (large enough to hold the chicken comfortably) with water. Add a tablespoon of salt. Bring it to a rolling boil.
The "Dunking" Method: This is crucial. Hold the chicken by the legs (or use a hook). Lower the chicken into the boiling water carefully. Let it sit for 30 seconds, then lift it out completely. Let the water inside the cavity drain back into the pot.
Repeat this 3 times.
Why? The cavity is cooler than the exterior. By dunking and draining, you equalize the temperature of the bird, ensuring the inside cooks at the same rate as the outside. It also prevents the skin from splitting due to sudden temperature shock.
The Simmer: After the third dunk, submerge the chicken completely. Add extra water if necessary to cover the bird. Turn the heat down immediately to the lowest setting. You want the water to be barely trembling—not boiling.
Cover and Cook: Cover the pot. Let it poach for about 40 to 50 minutes depending on the size of the bird.
Pro Tip: Use a thermometer. The internal temperature at the thickest part of the thigh should reach 75°C (165°F).
Turn Off Heat: Once the time is up, turn off the heat but leave the chicken in the hot water for another 10 minutes to finish cooking gently.
Phase 3: The Ice Bath (The Shock)
Time needed: 10 minutes
Prepare the Bath: While the chicken is resting in the pot, fill a large basin with cold water and lots of ice cubes.
Transfer: Carefully lift the chicken out of the hot broth (save the broth!). Drain the cavity liquid back into the pot.
Shock: Immediately plunge the chicken into the ice bath. Turn it over to ensure even cooling. Let it sit in the ice water for 10-15 minutes.
Why? This stops the cooking process instantly (preventing dry breast meat). More importantly, the collagen in the skin contracts immediately, creating that desirable gelatinous layer between the skin and meat.
Rest and Glaze: Remove the chicken from the ice bath and pat it dry with paper towels. Mix 1 tablespoon of sesame oil with 1 tablespoon of light soy sauce. Rub this mixture all over the chicken skin. This prevents the skin from drying out and gives it a beautiful golden sheen.
Phase 4: The Rice (The Heart of the Dish)
Time needed: 25 minutes
Render the Fat: Take the reserved chicken fat pads from Phase 1. Place them in a wok or pot over medium-low heat. Let them render down slowly until you have liquid oil and crispy cracklings (you can eat the cracklings as a chef's snack!). Remove the cracklings, leaving the oil.
Sauté Aromatics: Into the hot chicken oil, add the minced garlic, minced ginger, and sliced shallots. Fry them until they are fragrant and turning light golden. Do not burn them.
Toast the Rice: Add the uncooked (but washed and drained) Jasmine rice to the pot. Stir well to coat every grain in the oil and aromatics. "Fry" the rice for about 2-3 minutes until the grains turn opaque and smell nutty.
Cook: Transfer the rice to your rice cooker.
Add Broth: Instead of water, ladle in the hot chicken poaching broth you saved.
Ratio: Use a 1:1 ratio or whatever your specific rice cooker requires for Jasmine rice.
Add Pandan: Tie the pandan leaves into a knot and place them on top of the rice.
Press Start: Cook the rice as normal. When it’s done, discard the pandan leaves and fluff the rice with a fork or paddle.
Phase 5: The Sauces (The Flavor Boosters)
While the rice cooks, make your sauces.
A. The Chili Sauce:
Blend the red chilies, bird's eye chilies, ginger, and garlic in a blender or food processor until you have a semi-smooth paste.
Pour into a bowl.
Stir in the lime/calamansi juice, sugar, salt, and a splash of the hot chicken broth.
Taste. It should be spicy, sour, and slightly sweet.
B. The Ginger-Garlic Sauce:
Place the grated ginger and minced garlic in a heat-proof bowl. Add salt.
Heat the neutral oil in a small pan until it is shimmering and just starting to smoke.
Carefully pour the hot oil over the ginger/garlic. It will sizzle aggressively. This cooks the raw edge off the garlic.
Stir in the sesame oil.
C. The Soy Drizzle:
Simply whisk together the light soy, dark soy, sesame oil, broth, and sugar until the sugar dissolves.
Phase 6: The Soup (The Side)
Bring the remaining poaching broth back to a boil.
Skim off any scum.
(Optional) Add chunks of winter melon or cabbage leaves and cook until soft.
Season with white pepper and salt to taste.
Garnish with spring onions.
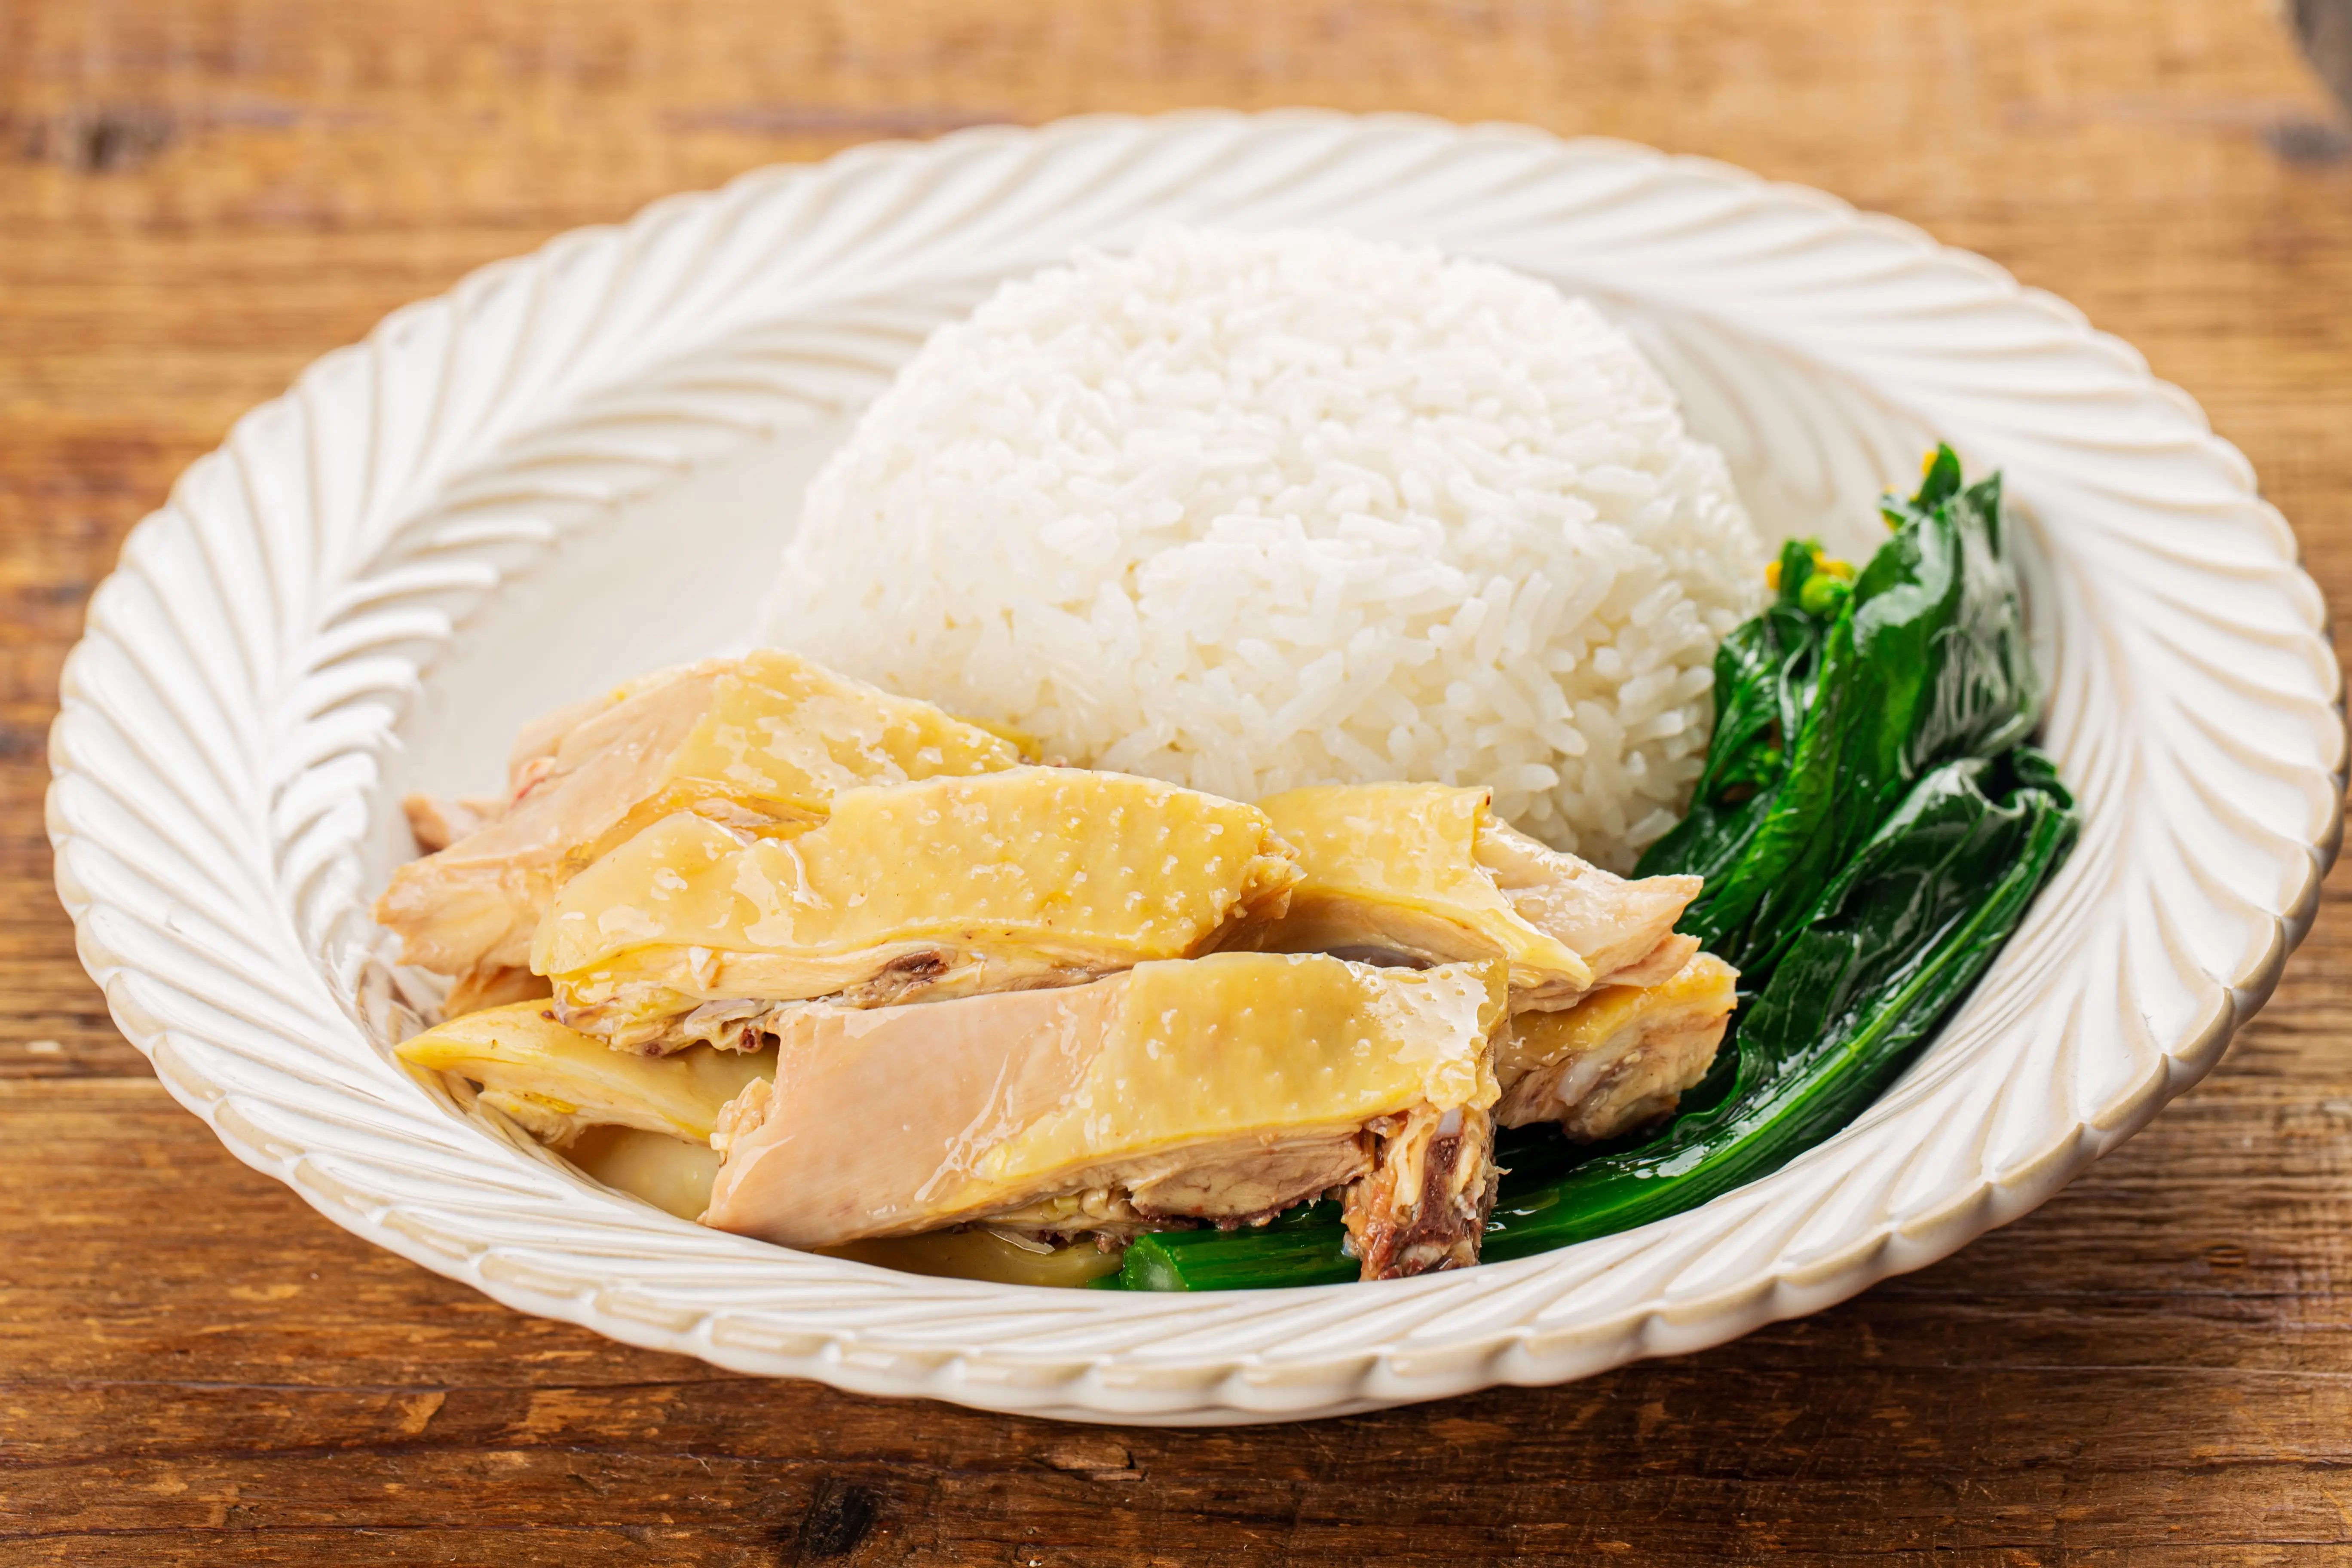
Phase 7: Assembly and Serving
Carve the Chicken: Traditional carving involves a cleaver. Remove the legs and wings. Separate the breast meat. Cut into bite-sized strips. If you are comfortable, deboning the meat makes for a very elegant presentation.
Plate the Rice: Pack the rice into a small bowl and invert it onto the plate for a perfect dome shape.
Garnish: Lay the sliced cucumber next to the rice. Place the chicken on top of the cucumber (or separately). Garnish with cilantro.
Serve: Place small dishes of the three sauces and a bowl of the hot soup on the side.
Important Tips & Tricks
1. The Quality of the Bird
Because the cooking method is so simple (poaching), there is nowhere for low-quality meat to hide. If you buy a water-logged, factory-farmed chicken, the meat will be mushy and the flavor bland. Look for "corn-fed" or free-range birds. Their muscle structure is denser, and the skin is thicker, which is essential for the texture.
2. Don't Skip the Exfoliation
Rubbing the skin with salt might seem superfluous, but it makes a huge difference. It removes the yellow, filmy layer on the skin and helps the skin tighten up during the ice bath.
3. The "Bloody" Bone Issue
In authentic Hainanese Chicken Rice, you will often see marrow that is red or pink near the bone. This is safe to eat as long as the juices run clear and the meat is opaque. The hemoglobin in the bones often stains the meat during poaching. If this bothers you, cook the chicken for an extra 5-10 minutes, but be warned: you sacrifice some tenderness.
4. Broth Management
You will have a lot of broth left over. Do not throw it away! This is "Master Stock" potential. You can freeze it and use it as a base for noodle soups, congee, or your next batch of Chicken Rice (it gets better every time).
5. Pandan is Essential
If you have an Asian grocer nearby, get the pandan leaves. It adds a grassy, floral, vanilla-like aroma to the rice that is the signature scent of this dish. Without it, it’s just chicken broth rice.
Common Mistakes & How to Avoid Them
Mistake 1: Boiling the Chicken
The Error: Keeping the water at a rolling boil for the entire hour.
The Result: The muscle fibers contract violently, squeezing out all the moisture. The meat becomes dry, tough, and stringy. The skin rips apart.
The Fix: Poach, don't boil. The water should barely be moving. The temperature should be around 80°C - 90°C.
Mistake 2: Soggy Rice
The Error: Using the standard amount of water plus the chicken fat.
The Result: Mushy, sticky rice that clumps together.
The Fix: Remember that the rendered fat counts as liquid, and the aromatics add moisture too. Be slightly conservative with the broth you add to the rice cooker. You want distinct grains, not risotto.
Mistake 3: Bland Sauces
The Error: Thinking store-bought sweet chili sauce is a substitute.
The Result: The dish loses its "punch." The sauces provide the acid and heat to cut through the fat of the chicken and rice.
The Fix: Make the sauces fresh. The acidity of the lime and the sharp heat of fresh chilies are non-negotiable.
Mistake 4: Skipping the Ice Bath
The Error: Letting the chicken cool on the counter.
The Result: The cooking process continues, drying out the meat. The skin becomes flabby and greasy rather than firm and jelly-like.
The Fix: Prepare the ice bath before the chicken is done. The shock is essential.
Recipe Variations
While the recipe above is the "classic" Singaporean/Hainanese style, there are regional variations you can try.
1. Roasted Chicken Rice (Shao Ji)
Instead of the white poached chicken, some hawkers serve roasted chicken.
Method: After poaching for only 20 minutes, remove the chicken and dry it thoroughly. Rub with a mixture of dark soy, honey, and five-spice powder. Deep fry specifically the skin or roast in a high-heat oven until the skin is crispy and brown.
2. Thai Style (Khao Man Gai)
The Difference: The sauce is different. Instead of three separate sauces, Thai style usually serves one dark, complex sauce made of fermented soybeans (tauchu), dark soy, ginger, chili, and vinegar. The chicken blood is sometimes cubed and added to the soup.
3. Vietnamese Style (Com Ga Hai Nam)
The Difference: Often served with a salad of shredded cabbage and Vietnamese coriander (rau ram). The dipping sauce usually leans heavily on fish sauce and ginger.
4. The "Healthy" Version
Method: Use skinless chicken breast and brown rice.
Note: While healthier, this fundamentally changes the dish. You lose the collagen from the skin and the schmaltz for the rice. If you do this, add extra ginger and garlic to the rice to compensate for the lack of fat flavor.
Storage & Reheating
Hainanese Chicken Rice is best eaten fresh, but leftovers can be managed if you are careful.
Storing
Chicken: Store in an airtight container in the fridge for up to 3 days. Keep the bones in if possible to retain moisture.
Rice: Store separately. Rice can spoil quickly, so refrigerate within 2 hours of cooking.
Broth: Freezes excellent for up to 3 months.
Reheating
This is tricky. You do not want to microwave the chicken on high, or it will become rubber.
Chicken: The best way to eat leftover Hainanese chicken is actually cold or room temperature (which is traditional). If you must heat it, place it in a steamer basket over boiling water for just 2-3 minutes to take the chill off.
Rice: Microwave with a damp paper towel over the bowl to steam the grains and make them fluffy again.
Soup: Boil on the stove.
Serving Suggestions and Pairings
A standard serving of Chicken Rice is a complete meal, but if you are hosting a dinner party, consider adding these sides:
Oyster Sauce Bok Choy: Blanched baby bok choy drizzled with oyster sauce and topped with fried garlic oil.
Braised Eggs (Soy Eggs): Hard-boiled eggs braised in the dark soy and spice mixture.
Chicken Liver/Gizzards: Traditionally, hawker stalls serve the poached innards alongside the meat. This is for the adventurous eater!
Achar: A spicy pickled vegetable salad (cucumber, carrot, pineapple) that acts as a palate cleanser.
Nutrition Facts
Estimated values per serving (based on a standard thigh/breast mix with rice and soup).
Nutrient | Amount |
Calories | 650 - 750 kcal |
Protein | 35g |
Carbohydrates | 60g |
Fat | 25g |
Saturated Fat | 7g |
Cholesterol | 95mg |
Sodium | 1200mg |
Note: The fat content comes largely from the chicken skin and the rendered fat in the rice. To reduce calories, remove the skin before eating (though you miss the texture!) and eat less rice.
FAQ: Frequently Asked Questions
Q: Can I use chicken parts instead of a whole bird?
A: Yes, you can use bone-in, skin-on chicken legs or thighs. Avoid using boneless skinless breasts as they will dry out too easily and lack the flavor needed for the broth. If using parts, reduce the cooking time to roughly 25-30 minutes.
Q: Why is my rice yellow?
A: Authentic Hainanese rice often has a slight yellow tint. This comes from the rendered chicken fat (especially if using a corn-fed bird with yellow fat). Some chefs add a pinch of turmeric powder to the rice pot to enhance this golden color, though it is optional.
Q: Can I make this in an Instant Pot?
A: You can, but it changes the texture.
Chicken: Pressure cooking tends to shred the meat rather than keeping it silky. Use the "Slow Cook" or "Sous Vide" function if your IP has it.
Rice: The Instant Pot makes great chicken rice. Sauté the aromatics and rice in the pot (Sauté mode), add broth, and cook on High Pressure for 4 minutes with a natural release.
Q: Is the chicken supposed to be cold?
A: In Singapore and Malaysia, the chicken is usually served at room temperature, while the rice and soup are piping hot. The chicken is not served "hot" because it has been resting after the ice bath. This temperature contrast is intentional and highlights the texture of the skin.
Q: I don't eat spice. Can I skip the chili sauce?
A: Technically yes, but you will miss the acid balance. If you can't handle heat, make the sauce but remove the seeds from the chilies completely, or use red capsicum (bell pepper) mixed with a tiny bit of chili to get the color and flavor without the burn.
Conclusion
Mastering Hainanese Chicken Rice is a rite of passage for any home cook interested in Asian cuisine. It teaches you the subtle power of temperature control, the importance of aromatics, and the beauty of using an entire ingredient—from the fat used in the rice to the bones used in the soup.
It is a meal that comforts the soul. Whether you are cooking it for a Sunday family dinner or preparing it as a meal-prep option for the week, the effort you put into the "dunking," the sauce-making, and the rice-toasting will be rewarded with every savory, silky bite.