How To Make Spicy Shrimp
Introduction
There are few ingredients in the culinary world as forgiving, versatile, and universally loved as shrimp. But there is a distinct difference between "okay" shrimp—the kind that is slightly rubbery, bland, and indistinguishable from the freezer aisle—and exceptional shrimp. Exceptional shrimp snaps when you bite into it. It carries the caramelization of a hot pan, the aromatic perfume of fresh garlic, and, in the case of this recipe, a fiery kick that wakes up your palate and leaves you craving the next bite immediately.
Welcome to the definitive guide on making Spicy Shrimp. This isn't just a recipe card; this is a masterclass. We aren't just going to throw spices in a pan; we are going to explore the nuances of searing, the science of spices, and the delicate art of not overcooking seafood.
In a world of complicated meal plans and hour-long braises, this Spicy Shrimp recipe is your best friend. It is the answer to the Tuesday night "I’m exhausted" dilemma, yet elegant enough for a Saturday night dinner party with a chilled glass of Sauvignon Blanc. The heat is customizable, the ingredients are pantry staples, and the payoff is massive compared to the effort required.
If you have been searching for a protein-packed meal that is low in carbohydrates but high in satisfaction, you have arrived at the right place. Let’s dive deep into the world of spicy, garlicky, buttery goodness.
What Makes This Recipe Special?
Before we fire up the stove, it is worth understanding why this specific method works so well. Many spicy shrimp recipes fail because they rely solely on one type of heat (usually just cayenne pepper) or they cook the shrimp in a sauce for too long, resulting in a tough texture.
Here is why this recipe stands out from the rest:
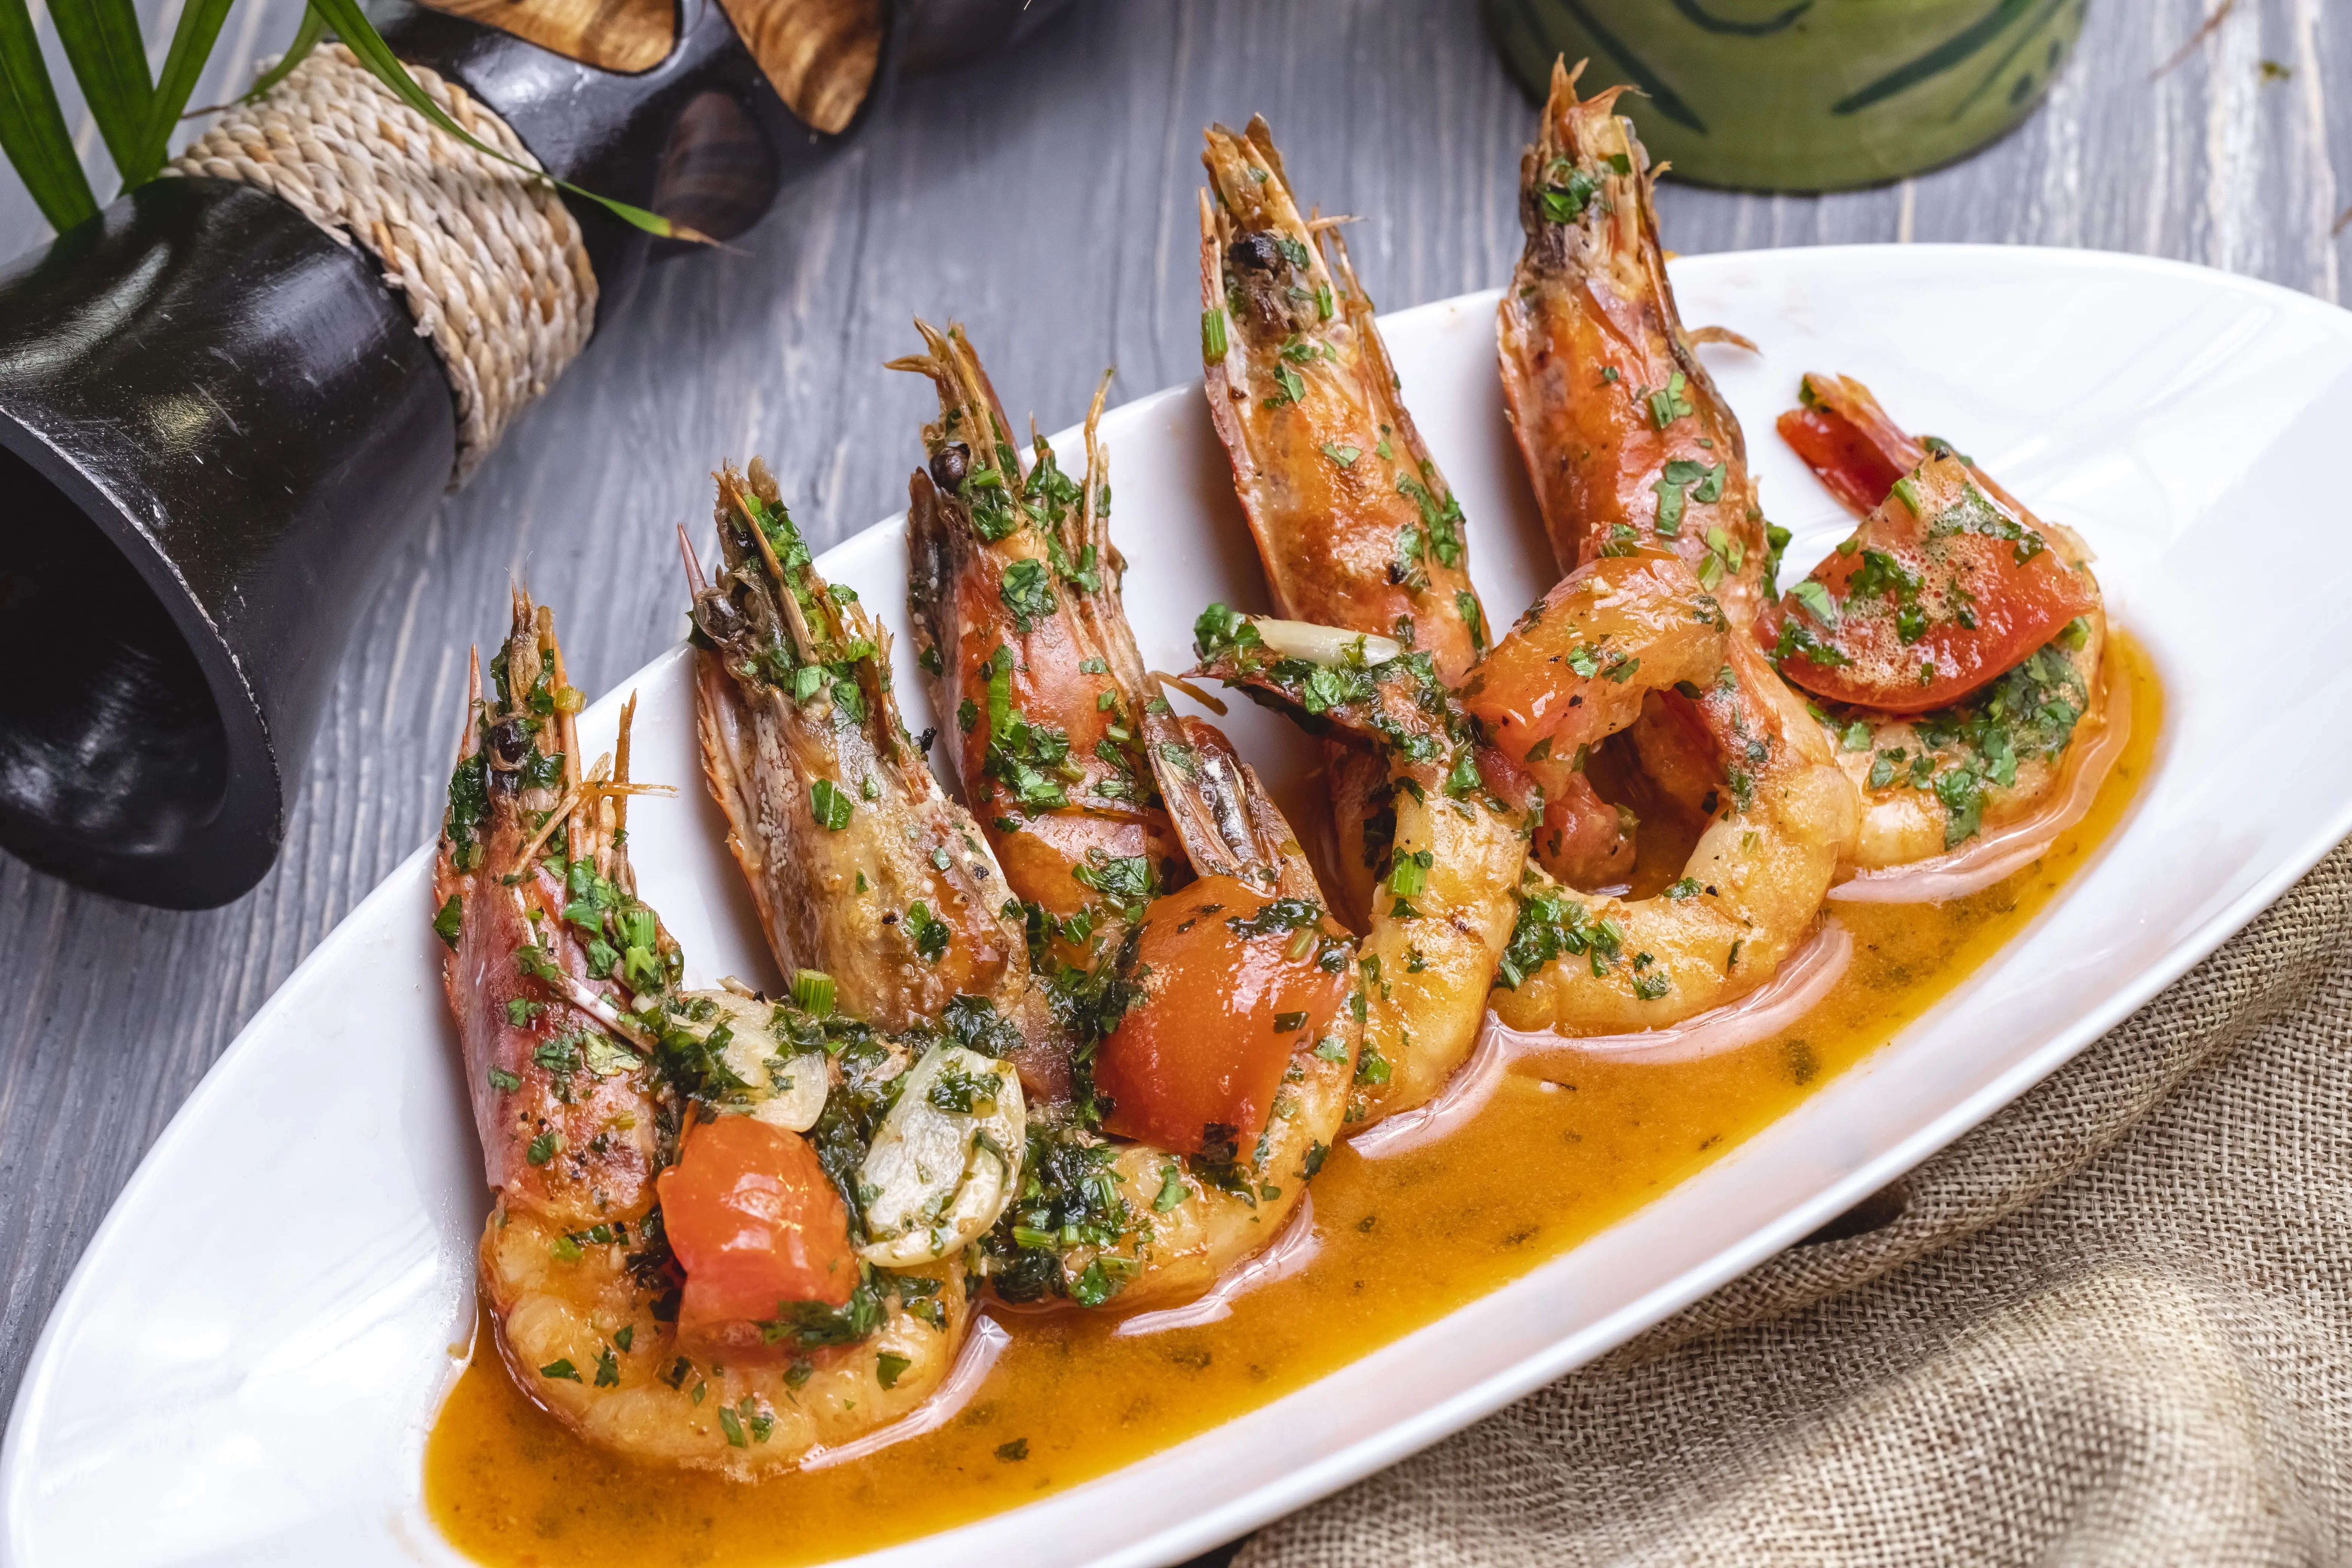
Layered Heat: We don't just use one pepper. We use a combination of dried red pepper flakes for texture, cayenne for immediate heat, and smoked paprika for depth. This creates a complex flavor profile rather than a one-note burn.
The Two-Fat Method: We use olive oil to start the sear (because it has a higher smoke point) and finish with cold butter. This technique, often used in French cooking monter au beurre, creates a glossy, emulsified sauce that coats every shrimp perfectly.
Texture Contrast: By searing the shrimp hard and fast, we create a slight crust on the exterior while keeping the interior juicy and tender.
Speed: From the moment you take the knife out to chop the garlic to the moment you plate the dish, less than 20 minutes will have passed.
Nutritional Density: Shrimp is one of the leanest proteins available. It is rich in iodine, antioxidants (specifically astaxanthin), and omega-3 fatty acids.
Ingredients: A Deep Dive
To make the best food, you must understand your materials. Let's break down the shopping list and explain why we are using each item.
The Star of the Show
Large Shrimp (1 lb / 450g):
Size: Aim for "Large" or "Jumbo" shrimp. Look for the count numbers on the bag, ideally 16/20 or 21/25. This means there are 16 to 20 shrimp per pound. Larger shrimp are harder to overcook, giving you a better margin for error.
Format: Buy them raw, peeled, and deveined (tail-on or tail-off is a personal preference). Never buy pre-cooked shrimp for this recipe; they will turn into rubber bullets if you try to sauté them again.
Fresh vs. Frozen: Unless you live on the coast and have access to a fishmonger, frozen is actually better. "Fresh" shrimp at the supermarket have often been thawed for days. Flash-frozen shrimp are preserved at peak freshness.
The Aromatics & Fats
Olive Oil (1 tbsp): Do not use your most expensive Extra Virgin Olive Oil here, as the high heat will destroy its delicate flavor notes. A standard olive oil or even avocado oil works well for the initial sear.
Unsalted Butter (2 tbsp): This is the finisher. Using unsalted allows you to control the sodium level. The milk solids in the butter will brown slightly, adding a nutty flavor that complements the chili.
Fresh Garlic (4-5 cloves): Powdered garlic will not cut it here. You need the sticky, pungent sugars of fresh garlic. Minced finely or sliced thin for texture.
The Spice Blend (The "Spicy" Part)
Smoked Paprika (1 tsp): This provides a beautiful rusty red color and a subtle smokiness that mimics the flavor of a grill.
Cayenne Pepper (½ tsp - adjustable): This is the sharp, aggressive heat. If you are sensitive to spice, drop this to ¼ tsp. If you are a "chili-head," bump it up to 1 tsp.
Red Pepper Flakes (½ tsp): These add visual appeal and a different kind of heat that hits the back of the throat.
Onion Powder (½ tsp): Provides a savory, umami backdrop that supports the fresh garlic without overpowering it.
Salt & Black Pepper: To taste. Kosher salt is preferred for its coarse grain and clean flavor.
The Acid & Garnish
Fresh Lemon Juice (½ lemon): Acid is the antagonist to fat and heat. It cuts through the richness of the butter and brightens the heavy spices. Bottled lemon juice lacks the essential oils found in fresh citrus zest and juice.
Fresh Parsley or Cilantro: For color and a grassy freshness to finish the dish.
Kitchen Equipment You Will Need
You don't need fancy gadgets, but the right tools make the process smoother.
Heavy-Bottomed Skillet: A Cast Iron skillet is the gold standard here. It retains heat incredibly well, allowing for a hard sear. Stainless steel is a close second. Avoid cheap, thin non-stick pans if possible, as they don't get hot enough to caramelize the shrimp effectively.
Tongs: Essential for flipping shrimp individually. Spatulas can be clumsy with small items.
Microplane or Zester: If you want to add lemon zest (highly recommended).
Paper Towels: Crucial for the prep phase (more on this in the steps).
Step-by-Step Preparation Instructions
Follow these steps meticulously for restaurant-quality results.
Phase 1: Preparation (The Most Important Part)
1. Thaw Properly:
If your shrimp are frozen, place them in a colander and run cold water over them for about 5 to 10 minutes. Do not use warm water, as this will begin to cook the proteins and mess up the texture.
2. The Drying Technique:
This is the secret to great shrimp. Once thawed, lay the shrimp out on a baking sheet lined with paper towels. Pat them down with more paper towels from the top.
Why? Moisture is the enemy of the sear. If the shrimp are wet, the water must boil off before the shrimp can brown. By the time the water boils off, the shrimp will be overcooked and gray. Dry shrimp = brown, tasty crust.
3. The Seasoning Mix:
In a small bowl, combine the smoked paprika, cayenne, onion powder, salt, black pepper, and red pepper flakes.
Tip: Mixing spices beforehand ensures even distribution. If you season the shrimp directly in the pan, some will be spicy, and others will be bland.
4. Coat the Shrimp:
Toss the dry shrimp in a bowl with half of the spice mixture. Save the other half for the pan. This ensures the flavor penetrates the meat.
Phase 2: The Cook
5. Heat the Pan:
Place your skillet over medium-high heat. Add the olive oil. Wait until the oil shimmers and you see the faintest wisp of smoke. This indicates the pan is ready for searing.
6. The Sear (Don't Crowd!):
Add the shrimp to the pan in a single layer. If you have too many shrimp, cook them in two batches.
The Science: Crowding the pan drops the temperature drastically. Instead of searing, the shrimp will release liquid and steam in their own juices.
Timing: Cook undisturbed for exactly 2 minutes on the first side. You will see the edges turn pink and opaque.
7. The Flip and Aromatics:
Flip the shrimp using your tongs. They should have a nice golden-red sear. Immediately add the remaining spice blend and the minced garlic to the pan.
Why now? Garlic burns quickly (in about 30 seconds to a minute). If you added the garlic at the beginning, it would be black and bitter by now.
8. The Butter Finish:
Add the butter to the pan. As it melts, it will mix with the spices and garlic oil. Swirl the pan or use a spoon to baste the shrimp with this spicy, foaming butter. Cook for another 1 to 2 minutes maximum.
9. The Acid Hit:
Remove the pan from the heat immediately. Squeeze the fresh lemon juice over the sizzling shrimp. You will hear a loud hiss and smell an incredible aroma. The residual heat helps the lemon juice emulsify with the butter into a sauce.
Phase 3: Plating
10. Garnish and Serve:
Sprinkle with fresh chopped parsley or cilantro. Serve immediately while hot.
Important Tips & Tricks for Perfection
The "C" vs. "O" Rule: How do you know when shrimp is done?
If the shrimp curls into a loose "C" shape, it is Cooked perfectly.
If the shrimp curls into a tight "O" shape, it is Overcooked (and likely rubbery).
Mise en Place: Because this recipe cooks so fast, you cannot be chopping garlic while the shrimp is in the pan. Have everything measured and chopped before you turn on the stove.
Tail On vs. Tail Off:
Keep tails on for finger food, appetizers, or aesthetic presentation.
Remove tails if you are serving this into pasta, tacos, or rice bowls (so guests don't have to use their hands).
Deglazing: After you remove the shrimp, there will be brown bits stuck to the bottom of the pan (called fond). Do not wash this! Add a splash of white wine or chicken broth to dissolve it, creating a quick pan sauce to pour over rice.
Common Mistakes & How to Avoid Them
Even with simple recipes, things can go wrong. Here is how to troubleshoot.
Mistake | The Result | The Fix |
Overcrowding the Pan | Shrimp turn gray, soggy, and lack flavor. | Cook in batches. It only takes a few extra minutes but makes a world of difference. |
Using Wet Shrimp | Oil splatters everywhere; shrimp steams instead of searing. | Pat them dry aggressively with paper towels. |
Burning the Garlic | Sauce tastes bitter and acrid. | Add garlic only in the last 60-90 seconds of cooking. |
Using Pre-Cooked Shrimp | Texture resembles rubber tires. | Always buy raw shrimp. |
Undersalting | The heat is there, but the flavor falls flat. | Seafood loves salt. Taste a tiny piece of the sauce before serving and adjust. |
Recipe Variations
One of the best things about this Spicy Shrimp recipe is that it serves as a "base code" that you can modify for different cuisines.
1. The Mexican Twist (Taco Ready)
Swap: Lemon for Lime.
Add: ½ tsp Ground Cumin and ½ tsp Chili Powder.
Finish: Top with fresh cilantro and serve in warm corn tortillas with a slaw.
2. Asian Fusion Fire
Swap: Butter for Sesame Oil (finish with it).
Add: 1 tsp grated fresh ginger and 1 tbsp Soy Sauce during the finish. Use Sriracha instead of Cayenne.
Garnish: Green onions and sesame seeds.
3. Cajun Bayou Style
Add: 1 tsp Dried Oregano and 1 tsp Dried Thyme to the spice mix.
Liquid: Add a splash of Worcestershire sauce with the butter.
Serve: Over creamy cheddar cheese grits.
4. Mediterranean Scampi
Reduce: The cayenne pepper (make it milder).
Add: ¼ cup White Wine immediately after flipping the shrimp.
Finish: Stir in fresh basil and cherry tomatoes.
5. Creamy Spicy Shrimp
Method: After removing the cooked shrimp, leave the juices in the pan. Add ½ cup of heavy cream and simmer until thickened. Return shrimp to the pan to coat. This makes an incredible pasta sauce.
Storage & Reheating
Shrimp is notorious for not being great as leftovers, but if you handle it correctly, you can get a second meal out of it.
Storage
Allow the shrimp to cool completely to room temperature.
Store in an airtight container in the refrigerator.
Shelf Life: Consuming within 2 to 3 days is best. Seafood spoils faster than poultry or beef.
Reheating (Crucial!)
The Microwave Danger: Microwaving shrimp usually results in a rubbery explosion. If you must use a microwave, use 50% power and cover the container.
The Stovetop Method (Best): lightly heat a pan with a little butter or water. Toss the shrimp in for just 60 seconds—just enough to warm them through. You aren't trying to cook them further.
Cold Application: Honestly? Leftover spicy shrimp is fantastic eaten cold. Chop it up and toss it into a Caesar salad or a grain bowl.
Serving Suggestions: Make it a Meal
Spicy shrimp is the protein, but what completes the plate?
Low Carb / Keto Options
Zoodles (Zucchini Noodles): Toss the zucchini spirals in the spicy garlic butter sauce left in the pan.
Cauliflower Rice: Roasted cauliflower rice absorbs the spicy juices beautifully.
Lettuce Wraps: Use butter lettuce leaves, add the shrimp, a slice of avocado, and a drizzle of crema.
Comfort Food Options
Angel Hair Pasta: The delicate strands of angel hair work well with shrimp. Aglio e Olio style (garlic and oil) pairs perfectly.
Cheesy Polenta: The creaminess of corn polenta balances the sharp heat of the cayenne.
Crusty Bread: Essential if you aren't watching carbs. You will want something to sop up that red, spicy butter sauce at the bottom of the plate.
The "Surf and Turf"
Pair 4-5 spicy shrimp with a grilled ribeye steak. The spicy shrimp acts as a flavor booster for the beef.
Nutrition Facts (Estimated)
Based on 1 serving (approx. 4oz shrimp)
Nutrient | Amount |
Calories | ~210 kcal |
Protein | 23g |
Fat | 12g |
Carbohydrates | 2g |
Fiber | 0.5g |
Sugar | 0g |
Cholesterol | 180mg |
Sodium | 450mg (variable based on salting) |
Note: Shrimp is naturally high in cholesterol, but dietary cholesterol has a smaller impact on blood cholesterol for most people compared to saturated fats. It is very low in saturated fat if you moderate the butter usage.
Frequently Asked Questions (FAQ)
Q: Can I use cooked shrimp for this recipe?
A: We strongly advise against it. Cooked shrimp cannot absorb the spices effectively and will become tough when reheated in the pan. If you only have cooked shrimp, thaw them and toss them in the warm sauce at the very end, just to heat them up, without searing.
Q: Is this recipe gluten-free?
A: Yes! As written, this recipe is 100% gluten-free. Just ensure your spices (like paprika) are not mixed with anti-caking agents that contain gluten (rare, but possible).
Q: How do I make it less spicy?
A: The heat comes from the Cayenne Pepper and the Red Pepper Flakes. To make a "Mild Garlic Shrimp," omit the cayenne entirely and use only a pinch of flakes. Keep the paprika; it adds flavor without the burn.
Q: Can I grill this instead of using a skillet?
A: Absolutely. To grill, thread the shrimp onto skewers (soak wooden skewers in water for 30 minutes first). Brush them with the olive oil and spice mix. Grill for 2-3 minutes per side. Melt the butter and garlic separately and brush it over the cooked shrimp before serving.
Q: What wine pairs best with Spicy Shrimp?
A: Spicy food can be tricky with wine. Avoid high-tannin reds (like Cabernet) as they clash with the spice.
Best Bet: An off-dry Riesling or Gewürztraminer. The slight sweetness cools the heat.
Dry Option: A crisp Sauvignon Blanc or Pinot Grigio cuts through the garlic and butter.
Beer: A crisp Mexican lager with lime or a light IPA pairs wonderfully.
Conclusion
Cooking restaurant-quality seafood at home does not have to be intimidating, expensive, or time-consuming. This Spicy Shrimp recipe proves that with a handful of pantry staples and fifteen minutes, you can create a dish that sings with flavor.
The magic lies in the details: drying the shrimp, managing the pan heat, and layering the spices correctly. Once you master this technique, you won't just have a recipe for dinner; you'll have a technique you can use for the rest of your life, adapting it with different herbs, spices, and acids to suit your mood.
So, go grab that bag of frozen shrimp, peel some garlic, and get that skillet hot. A delicious, fiery, satisfying meal is just moments away.